Pages

Showing posts with label DIY. Show all posts

Tuesday, September 20, 2011

ROY G BIV - Crafting in Rainbow Colors

Show me your colorful handmade crafts.  Here is mine - an Ojos de Dios (God's Eye) inspired by a tutorial on Etsy.  I can see myself getting addicted to making these!


Share your ROY G BIV rainbow crafts!

Sunday, November 28, 2010

Raggedy Christmas Wreath

It's time to decorate for Christmas!  Here is a simple Christmas wreath tutorial.  The cost is minimal and the entire project will take less than an 1 hour to complete.   The final product is a funky, raggedy wreath that has a very cute handmade look to it.  It's a great appreciation gift to give to teachers, friends and family members especially if your child has a hand in making this holiday project.


You will need:

Wooden Embroidery Hoop.  I used one with a 5" diameter.  Take it apart.  Each side will make 1 wreath.


Embroidery Ring

Fabric in your choice of colors that you will tear into strips about 1.5" wide and cut into lengths of 5.5" and one longer piece (any color) about 12" long.   It doesn't need to be perfect in size.  I used red, checkered red, white and gold fabric. 


Fabric Strips
 
Step 1:  Tie your fabric strips onto your ring.  It doesn't matter where you start but try to alternate the colors.  Continue to tie around the entire hoop, leaving a small space to tie a loop for hanging.


Tie Strips to Ring

Step 2:  When you're nearly done with filling up your ring with your fabric strips, loop the longer piece of fabric onto you ring.  This will be used to hang your wreath.  Continue to tie more fabric pieces onto your ring until it is completely covered.  (I hid the knotted part of my long hanger piece near the hoop base.)


Make a Hanger

Step 3: Optional - trim the fabric on your wreath if you want a more "structured" look.
Step 4:  Hang your wreath.


Completed Wreath
 This is how the back of the wreath looks like.

Back View

Happy Holidays! 


Saturday, November 13, 2010

Quickie Child's Apron

For the child who wants to help out in the kitchen or dress up, here's a tutorial on how to quickly make a child's apron.  An old pillowcase can be repurposed and made into a cute apron. This craft project required only a little sewing and the finished apron looks like this.

Quickie Pillowcase Apron
Step 1:
You will need to gather an old pillowcase, sew a strap for the waist and two smaller shoulder straps to go around the neck. You can use ribbons, cords or sew your own straps.
Step 2:
Sew the shorter straps onto the top corners of the pillowcase (on the seamed side not on the open side where you would slide your pillow into the case).  These are the neck straps.  For the waist strap, stitch the longer piece onto the pillowcase - just enough so it holds the waist strap into place.  The waist strap should be placed closer towards the top because you need room for pockets.

Adding straps onto the pillowcase.
 Step 3:
Fold the bottom of the pillowcase up to make pockets.  Pin into place then sew the edges to make the pocket.  Sew two straight stitches up through the big pocket  (like shown in the image below).  This will keep your pocket from drooping while creating handy pocket dividers.  By using the opened side of the pillowcase (rather than the seamed side) to make the pockets, you'll notice that compartments have doubled for more pocket space.  Decorate, embellish...have fun.

Your repurposed pillowcase - now an apron!
You've completed your child size apron made from an old pillowcase!
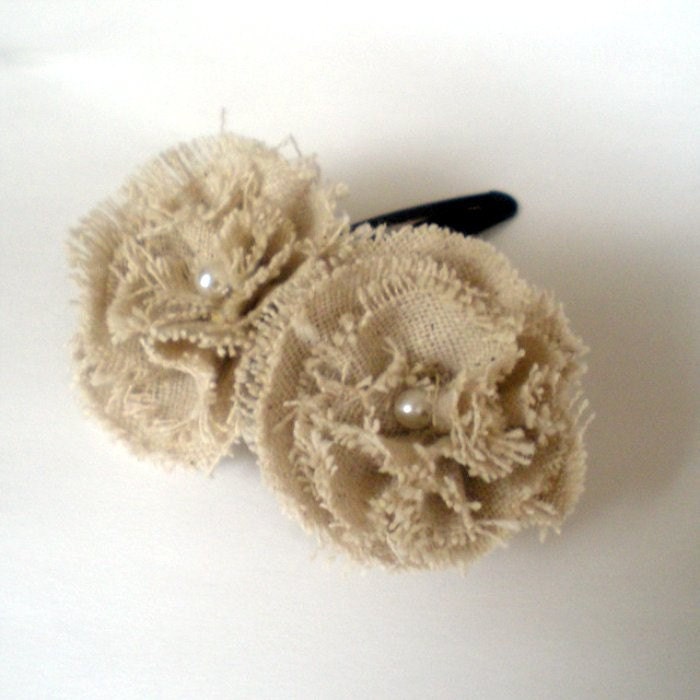
I added one of my frayed flowers by the shoulder. 

You'll notice that the apron has a loose, cowl neck fit around the neck.  If you would like a tigher fit, just knot the corners by the shoulder straps.

Another collar variation would be to sew a panel at the top where you could make a drawstring collar that would gather around your neck.

This apron would be a great gift if you use a pretty pillowcase.  You could add a recipe in the pocket along with fun kitchen tools.

I hope enjoyed this easy craft tutorial!

Ongoing giveaway contest. Submit an entry.
***

Wednesday, November 10, 2010

Frayed Flowers Tutorial

I have this frayed flower listed on Etsy but you can make your own in just a few steps.

Frayed Flowers Hair Clip
  1. Using a cup as a template, I traced the rim on my fabric.
  2. I cut it out.
  3. By freehand, I cut the fabric in a continuing spiral pattern - thicker on the outer ring and getting smaller as you near the center. 
  4. Using a straight stitch, sew the spiral near the edges where you just cut. I started from the inside and moved out.
  5. Gather along the stitch and arrange into a flower pattern.
  6. Sew a bead or button in the center of the flower.
  7. Finally, using a glue gun, I glued the flower to the snap pin.  (Make sure your flower does not fray from the center out by making sure you glue close to the edge where you sewed.)
All done.

Remember to enter the Spiral Rope Bracelet Giveaway!

Wednesday, November 3, 2010

Knots in Her Hair

Easy to make but very cute hair clips!


I got a scrap piece of fabric and cut it into two 3" x 3" squares.
I rolled it up.
Tied each one into loose knots.
Used my glue gun to stick it onto snap hair clips.

Thursday, August 19, 2010

Free and Cute

Free and Cute...two wonderful words!  Check this out...

Cute Kawaii Stuff - Free DIY Paper Box Animals
see more Must Have Cute

Lots more paper toy templates that you can download for free at Paper Box World.


JS6J4Z4GR3M5

Wednesday, July 28, 2010

Pokemon Friendship Chips

pokechipsThis is what my children have taught me about Pokemon.  I admit to day dreaming when my kids tell me Pokemon facts so I hope this info. is accurate.
  • Ash Ketchum is the main character of the Pokemon series.  He is a Pokemon Trainer and has entered many Pokemon League competitions.  The Pokemon story follows Ash on his journey to become a better Pokemon Trainer.
  • Pikachu is Ash's Pokemon.  He was Ash's very first Pokemon.  Pikachu's power is an electric type attack. 
Other characters include Misty, Brock, Jesse, James, Professor Oak and 400 + Pokemon mascots.  Pokemon fans have their favorite mascots and I must say, some of these guys are cute!

A Pokemon fan can't have enough Pokemon souvenirs.  Nearly everywhere you look, you'll be able to find Pokemon games, trading cards, stuffed animals, clothing, etc. 

Here is a way to make a Pokemon collectible without spending too much.  I call these "Friendship Chips - for wearings, sharing, trading and collecting".  Easy to make but lately I've had a hard time finding the round chipboards that make up the base of this craft.  In the past, I've purchased Bazzil chips online at Joann.com.  If you do make this project, please let me know.  I'd love to hear from you!

Pokemon Web Site

Monday, July 26, 2010

Making Christmas Ornament Earrings


I'm going to show you how I made these Christmas ornament earrings. This is not really a tutorial but you may be able to fill in the blanks and make your own "ornament earrings".

These are the materials I used.

Ear hooks, glass pearl beads and jump rings (not shown).
Toho seed beads, size 11 in transparent Siam ruby and silver lined frosted crystal. 

Just a note, although both bead colors size are 11, the silver lined beads are a little bigger than the transparent beads so if you plan on using it in the same project, the beads may not look uniform.  In this project, the different sizes do not really matter.

Now, using fishing line (monofilament), I tie on a red bead and string it through the pearl.  I double the fishing line to reduce the "stretchiness".


Then I add seven red beads and once again I string it through the pearl so that the red beads wrap half way around the pearl.


I keep doing this until I have seven strands around the bead. Then I top the bead with 2 crystal seed beads. For strength and holding power, I thread through the pearl once again and tie off the line.

I add a jump ring and the ear hook and I am done.  Make one more and you have a set of Christmas ornament earrings!

You can make various colors of these earrings and use different shades and kinds of beads for the center such as acrylic faceted beads, metallic beads, etc.  Once you've done one, you'll see how easy it is and you'll come up with your own designs.

Have fun celebrating Christmas in July!

Sunday, July 18, 2010

Twilight Themed Gifts

I'm on an Eclipse high!  Ever since watching the latest Twilight saga movie, I've been fixated with creating Twilight themed crafts.  It would be great to give my Team Edward and Team Jacob buddies a gift of friendship and appreciation that would also remind them of their favorite vampire or wolf.

I made Friendship Chips (which is my all time favorite craft) and added Edward and Jacob images on one chip to commemorate their Eclipse alliance.  My Friendship Chip instructions are found here.


Now I wanted something to make it a little more fun so I got an apple, wrapped it in cellophane and added the Friendship Chip.  Eat the apple and keep the chip.


Alright so most people associate the apple with Edward and Bella's forbidden love.  So possibly wrap applesauce to represent Jacob's conflict with Edward...?  For Bella fans, I have this.


The apple with a bite in it.

Thanks for stopping by!
*****
Flat Leilani is also a fan.


Enhanced by Zemanta

Tuesday, July 6, 2010

Tutorials


I enjoy doing tutorials but it does take me a considerable amount of time to photograph nice photos and make sure my grammar and punctuations are correct because I don't want the reader to mess up in step 1 and exclaim, "These instructions are TERRIBLE!"  For that reason, I don't do tutorials too often but here are my links to projects I have done in the past. 

No Sew T-Shirt Bag:  So Easy!  So Handy!  Made from an old t-shirt.
 *****

Puffy Fabric Flowers:  A poofed-up yo yo.

*****
Reversible Round Gift Pouch:  Makes a great bag for jewelry.


*****
DIY Paper Gift Bags:  Recycle old gift wrapping paper.

*****
Flat Gift Bags/Envelopes:  More paper recycling.

*****

To view the rest of my craft tutorials, please go to Cut Out + Keep.  Thanks CO+K for hosting my how-to's!

Boo-Boo Buddy First Aid Kit
Princess Tulle Tiara
Spring Wreath
Friendship Clips/Bookmarks
Friendship Chips (My Absolute Favorite!)
Felt Origami Kitty

Have a great day!

I hope I posted this with only a few mistakes...
Related Posts Plugin for WordPress, Blogger...